SCIM user and group synchronization#
SEP can be configured to synchronize users and groups with external providers using the System for Cross-domain Identity Management (SCIM) protocol. Once users and groups have been added, use access control systems in SEP to provision access to data.
Configuration#
To configure user and group synchronization with a SCIM provider, you must configure the following components:
Configure an internal group provider in SEP
Enable user provisioning with SCIM
Configure an external provider
Configure an internal group provider#
SEP requires a group provider configuration to handle imported users and
groups internally. Create an etc/group-provider.properties configuration
file on the coordinator with the following contents:
group-provider.name=starburst
The SEP group provider includes an optional cache for user/group lookups, which is enabled by default. It can be disabled with the following property:
starburst-group-provider.cache.enabled=false
When caching is enabled, the following optional properties are also available:
starburst-group-provider.cache.ttl=10s
starburst-group-provider.cache.maximum-size=1024
Enable user provisioning with SCIM#
Add the following configuration properties to config.properties to enable
SCIM user provisioning in SEP and define a secret token for the provider
to connect:
starburst.users.provisioning.type=SCIM
starburst.users.provisioning.scim.secret-token=secret_token
Network connectivity requirements#
SCIM provisioning requires your identity provider to connect to the SEP
coordinator’s SCIM API endpoint (/scim/v2). If you run your SEP cluster in
a private network, you must configure network access to enable SCIM
provisioning.
Network access#
Use one of the following approaches to allow your IdP to reach the coordinator’s SCIM endpoint:
IP whitelisting: Add your IdP’s IP ranges to your security groups.
Public endpoint: Expose the SCIM endpoint (
/scim/v2) to the internet with a secure load balancer.Reverse proxy: Use a reverse proxy to forward SCIM requests to your internal SEP coordinator.
Configure an external provider#
The external identity provider service must be able to connect to the SEP coordinator, either directly or through a network proxy.
The following external identity providers are supported for user and group synchronzation with SCIM:
Microsoft Entra ID (formerly Azure Active Directory)#
To connect Microsoft Entra ID (formerly Azure Active Directory) to SEP as a SCIM identity provider, follow these steps:
In Azure, go to Enterprise applications and click New application.
Click Create your own application.
Provide a name for the application, select Integrate any other application you don’t find in the gallery (Non-gallery), and click Create.
From the navigation menu, select Users and groups. Click Add user/group. In the Add Assignment pane, click None Selected.
Use the Search bar to find and select the users or groups to assign the application.
On the newly created application page, navigate to Provisioning and click Get started.
Select Automatic in Provisioning Mode. Provide the SEP coordinator URL with
/scim/v2suffix in Tenant URL field, and the previously-configured token in the Secret token field.Click Test connection. If successful, click Save.
Go to Overview page and select Start provisioning. The provisioning process is scheduled and may take some time to finish.
Okta#
To connect Okta to SEP as a SCIM identity provider, follow these steps:
In Okta, go to Applications and click Create App Integration.
Select SAML 2.0 and click Next.
Note
Okta does not support SCIM provisioning for OIDC - OpenID Connect applications. To use SCIM provisioning with OAuth 2.0 authentication you must create a second app integration with the SAML 2.0 sign in method.
Provide a name for the integration and click Next.
Provide a Single sign-on URL and Audience URI (SP Entity ID). These values are not used during provisioning; set them to the SEP coordinator URL and click Next.
Select I’m an Okta customer adding an internal app and click Finish.
Select the General tab, then click Edit in the App Settings section.
Check the Enable SCIM provisioning checkbox and click Save.
Select the Provisioning tab and click Edit.
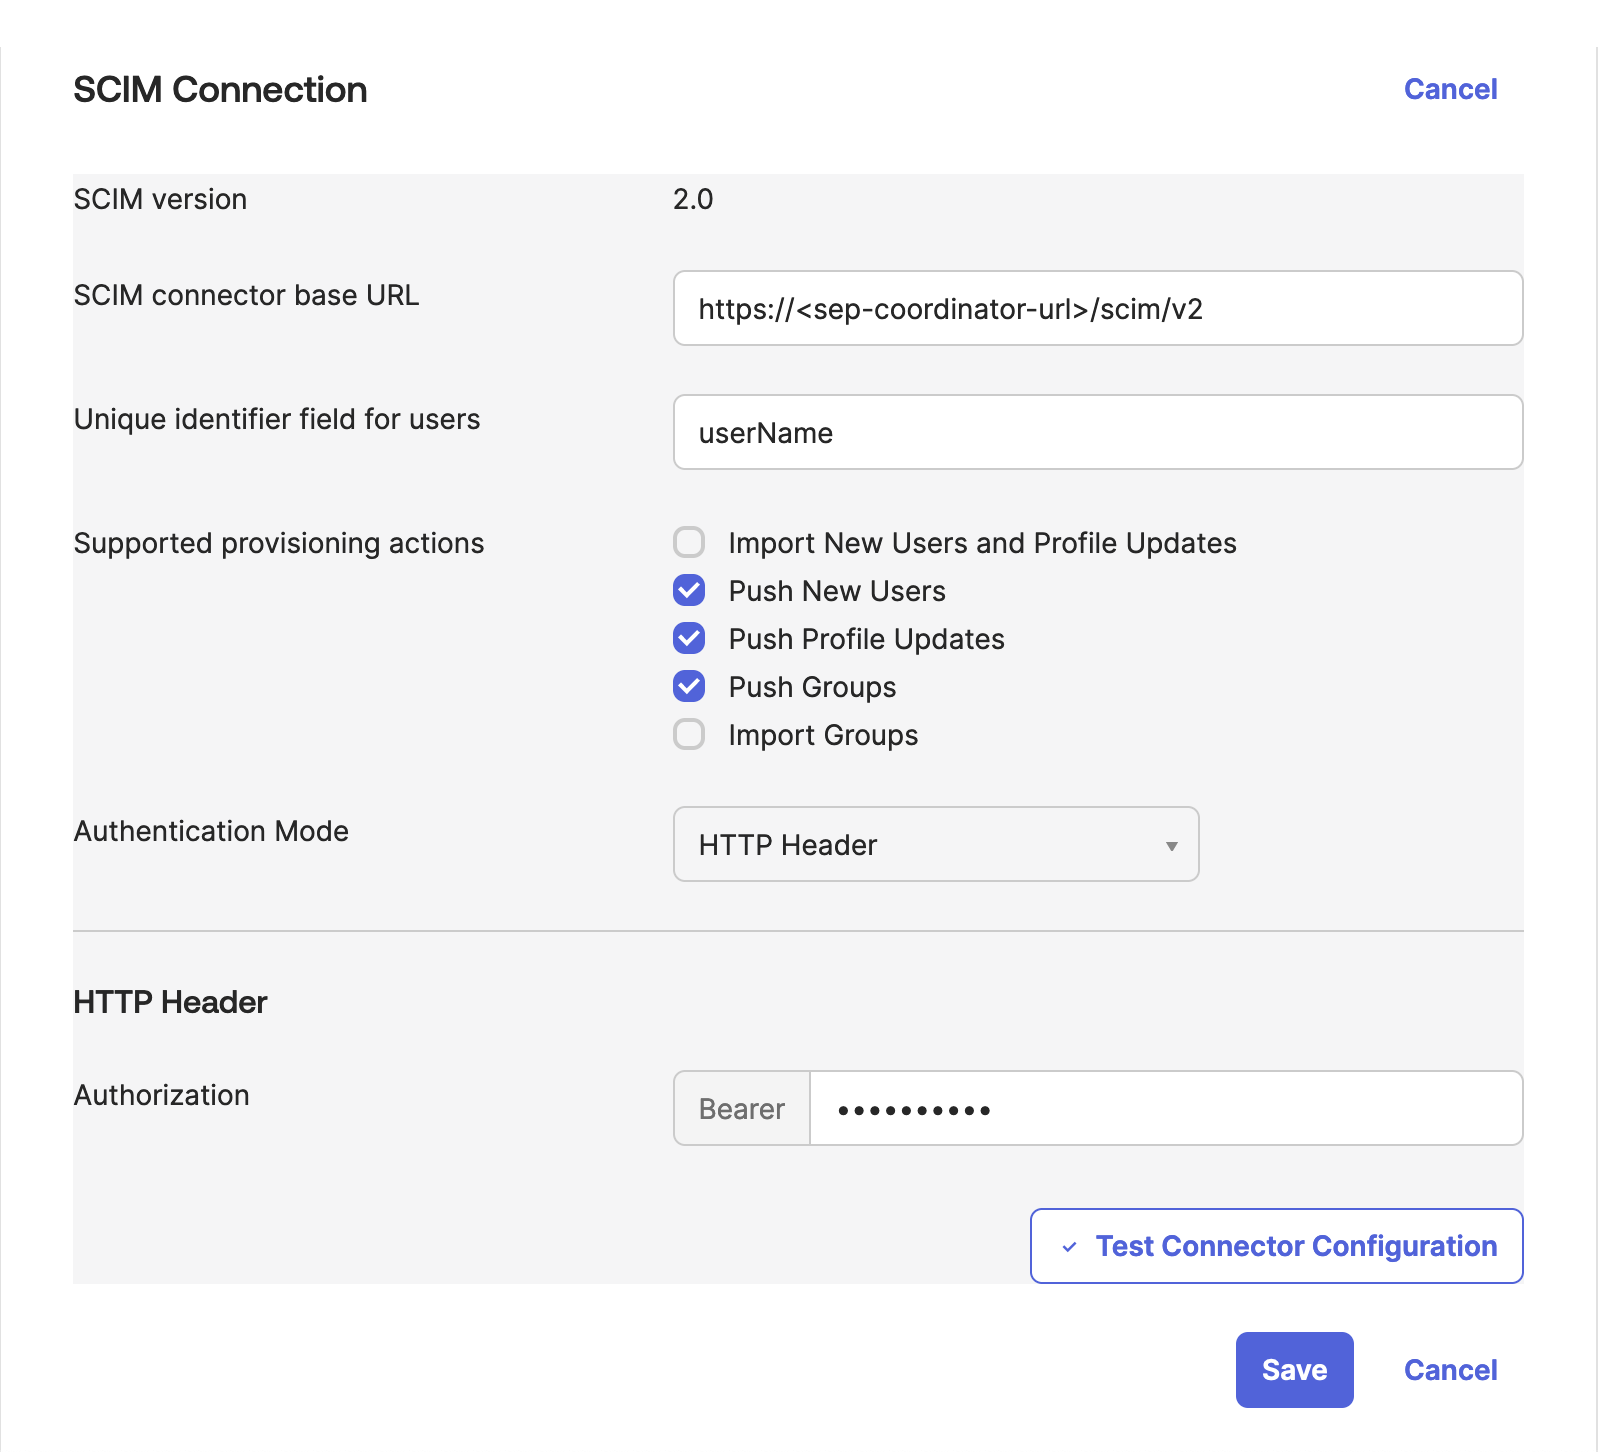
Provide the SEP coordinator URL with the
/scim/v2suffix in the SCIM connector base URL field, and a user identifier in Unique identifier field for users.Check Import New Users and Profile Updates, Push New Users, Push Profile Updates, and Push Groups.
Select the HTTP Header authentication mode and the previously-configured token in the Authorization field.
Click Test Connector Configuration. If successful, click Save.
Select the Assignments tab. In the Assign drop-down menu, select the users or groups to assign the app integration.
On the Provisioning tab, click Edit again.
Check Enable for Create Users, Update User Attributes, and Deactivate Users, then click Save.
Select the Push Groups tab. In the Push Groups drop-down menu, select the users or groups to add to group push.
Next steps#
Once provisioning is successful, users and groups from the external service should appear in SEP. You can now configure access control rules using Built-in access control overview or Apache Ranger overview that apply to these users and groups.
Limitations#
Okta does not support using the same group for both app assignments and Group Push. To maintain consistent group membership between Okta and your downstream apps, you must configure separate groups for app assignments and Group Push. For more information, see the Okta documentation.
SEP does not support nested group membership.