Starburst Enterprise web UI#
This topic provides an overview of the features available in the web UI. The Starburst Enterprise web UI is the default web interface when you access an SEP cluster that has a valid license configured.
A cluster with no license configured shows the Trino web UI by default. The Trino UI lacks SEP features such as Insights, data products, the query editor, and domain management.
Caution
Use a stable network connection to access Starburst Enterprise interfaces such as the Starburst Enterprise web UI. Connections over VPNs, 3G, or high-latency, low-throughput networks may cause instability or service errors.
Direct URL access#
Access the Starburst Enterprise web UI directly with the URL of your coordinator.
Now that this interface is the default for licensed clusters, there is no longer
a need to append the /ui/insights context to your coordinator’s URL. Use
simple URLs such as the following:
https://sep.example.com/http://sep.example.com:8080/https://localhost:8443/
Authentication#
On a TLS-enabled cluster, enter the credentials required by the cluster’s authentication method. Contact your site’s network administrator for your username, password, and other credentials as required by your cluster.
On a cluster with no security method enabled, the login screen shows a username field with a disabled password field. Enter any username to log in; no password is required or allowed.
Note
The login screen you encounter is determined only by the cluster’s security configuration, including TLS support, and is independent of license status. There is no separate security configuration for the Starburst Enterprise web UI.
Timeout properties#
The web-ui.session-timeout configuration property controls the timeout interval in deployments
not using an identity provider (IdP) for authentication. This property dictates how long a user
authentication token is valid and can be considered the maximum amount of time a
user can stay logged in to the Starburst Enterprise web UI without reauthenticating.
Deployments that use an IdP that substitutes for login credential forms, such as AzureAD and Okta, are subject to the session timeout defined in their IdP’s configuration.
When the timeout interval is reached, a dialog is displayed giving users the option to logout to exit the Starburst Enterprise web UI and return to the login screen, or to dismiss the dialog to stay on the current page without requesting new data. For example, if a session times out during a long-running query, the query is allowed to finish. Users can view and download the existing query result set in the query editor by clicking Dismiss in the modal dialog and then clicking Download, but cannot run a new query or navigate to another screen until logged back in.
The insights.user-inactivity-timeout configuration property tracks events
such as clicks or keystrokes in the Starburst Enterprise web UI and automatically logs out a user
when they are inactive for a set amount of time. This property is disabled by
default and can be configured alongside the web-ui.session-timeout property.
This property is typically used as an additional security feature by setting the
inactivity timeout to a shorter duration than the session timeout.
To remain active, users must move the mouse or press a key. When the timeout interval is reached, a dialog is displayed with a 15 second countdown. If no action is taken before the countdown timer reaches 0, the user is logged out of the Starburst Enterprise web UI and returned to the login screen. Queries running in the background time out if the user is logged out due to inactivity.
Feature tabs#
The feature column of the Starburst Enterprise web UI shows several menus with sub-features, described next.
At the bottom of this column, find the Version, Environment description, and Uptime of the connected cluster.
Overview#
The Overview tab is the default tab opened when the Starburst Enterprise web UI starts, and shows a summary of your cluster’s current activities.
Query#
The Query menu contains the following features:
Query editor#
The Query editor tab provides a web-based client interface for writing and executing SQL queries.
Saved queries#
The Saved queries tab allows you to save, manage, and share query tabs. The Shared with me tab lists query tabs that have been shared by other query owners to your assigned roles, and lets you preview and run queries in shared query tabs.
Query overview#
The Query overview tab shows a list of queries running or recently run on your cluster. Click a query ID to open the details for that query.
Data#
The Data menu contains the following data management options:
Catalogs#
The Catalogs tab provides access to your configured catalogs:
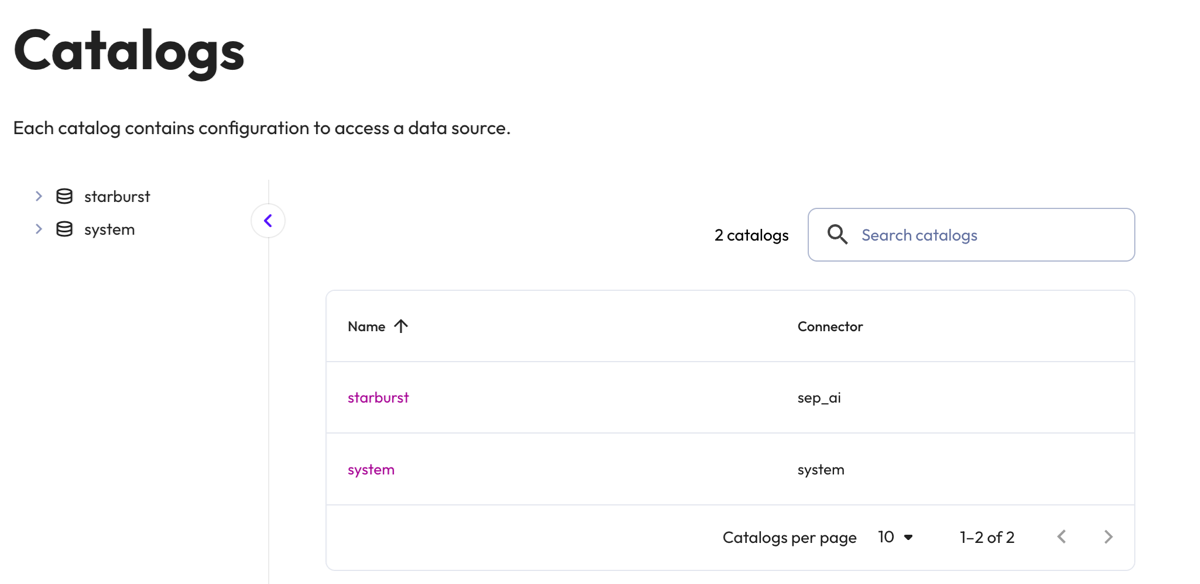
Use the catalog tree pane to explore the schemas, tables, views, and columns in the current catalog.
Each catalog is listed along with the name of the connector it uses. Click the name of a catalog to browse its contents.
You can write and edit a description by clicking the text editor in the header of the catalog, schema, and table levels. On the table level, click the edit pencil icon in the Description column to write and edit a description for the selected table column.
Data maintenance#
The Data maintenance tab allows you to perform maintenance operations on your data, such as data file compaction, statistics collection, and deletion of outdated snapshots and unused files.
Schema discovery#
The Schema discovery tab helps you identify and register tables and views that are newly added to a known schema location.
Data products#
The Data products tab allows you to publish, find, and manage curated data assets in your organization.
AI#
The AI menu contains a number of options for working with Starburst AI:
AIDA#
The AIDA tab opens Starburst’s AI Data Assistant (AIDA), a conversational analytics assistant.
Models#
The Models tab lets you connect to large language and embedding models from supported providers. Configured models are used by AI functions and by AIDA.
Guardrails#
The Guardrails tab lets you configure the protections applied to all AI models and agents on the cluster, such as agent protections, data product protections, prompt limiting, and topic filtering.
Access control#
The Access control menu provides security and access management features:
Roles and privileges#
SEP features an optional built-in role-based access control (RBAC) system that is integrated with the Starburst Enterprise web UI. If enabled, an authorized administrator can control users’ access to data on the Roles and privileges tab.
See Built-in access control overview for more information.
Masks and filters#
The Masks & filters tab allows you to restrict what data users can see at the row and column level.
Admin#
The Admin menu contains administrative tools and monitoring features:
Workload management#
The Workload management tab provides you with detailed insights to efficiently manage and monitor resource groups, check their activity, identify related queries, and pinpoint bottlenecks caused by overly strict limitations, ensuring smoother and more efficient operations.
Cluster history#
The Cluster history tab shows the resources consumed by your cluster when responding to recent queries, or for a specified time period.
Cluster logging#
The Cluster logging tab allows you to modify log levels across your cluster.
This feature provides the same logging capabilities as manually editing your
log.properties file, but it does not require a cluster restart for changes to
apply. You must have access to the sysadmin role to use this feature.
For more information about loggers and log levels, see Log levels.
Click Modify logger to modify a logger. Only the loggers you modify through this interface appear in the Loggers list. The list contains the following columns:
Loggers: The name of the logger.
Log level: The severity of the log messages. Choose from the following log levels:
Error
Warn
Info
Debug
Reset to default log level: Resets the logger to its default configuration.
Log levels are hierarchical. Each log level includes the log messages from the levels above it. For example, Debug includes messages from Info, Warn, and Error.
The changes you make in the Cluster logging tab apply to all nodes in the cluster. The changes persist between cluster restarts, but they do not take effect until all nodes start.
Audit log#
The Audit log tab provides access to an audit trail for query executions.
Usage metrics#
The Usage metrics tab provides an overview of the cluster usage over a specified period of time and a cost estimation tool.
Notification settings#
The Notification settings menu item links to a pane where you can create notifications for certain events, such as failed catalog loads or SQL jobs.
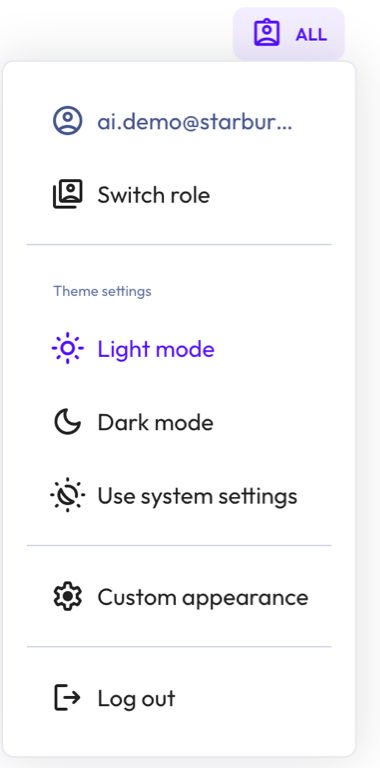
User menu#
The user menu in the upper right shows the name of the currently logged-in user, as well as their currently applied roles.
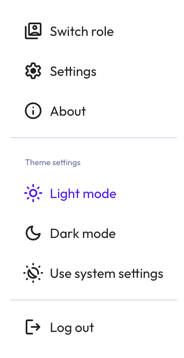
Clicking on the Switch roles menu item brings up the Switch roles UI.
The Switch roles UI allows users to switch between specific roles they have
been granted, or to apply all roles that they have been granted. To apply all
roles granted, click the * option in the Switch roles UI. This has the
same effect as executing the SET ROLE ALL SQL statement.
The Settings menu item is available to administrative users. Clicking on the Settings menu item brings up the Settings UI, with the following options:
License - This tab displays all possible SEP features, including connectors, and their statuses based on your current license file. Your license file is available by clicking the Download current license button.
Appearance and theme - This tab lets you edit the organization name, logo, login page, colors, agent name, and disclaimer text.
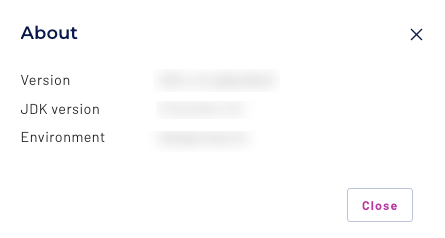
The About option displays the SEP and JDK versions, as well as the environment.
The Theme settings section lets you choose the default theme for the UI from the following options:
Light mode
Dark mode
Use system settings
The Use system settings mode automatically switches the theme based on the settings of your operating system. For example, if your operating system is set to use dark mode then SEP uses dark mode as well.
The Log out option logs you out of the current session.
Appearance and theme#
The Appearance and theme screen lets you customize the branding of the Starburst Enterprise web UI and the AIDA portal. Configure your organization name, logos, login page text, theme colors, and agent details to match your organization’s identity.
Customizing appearance and theme settings requires the custom login user interface privilege.
To customize appearance and theme:
From the user menu, select Settings.
Select the Appearance and theme tab.
Click Edit theme to open the Appearance and theme settings dialog.
The following sections describe the dialog’s options. Click Save changes to apply your updates. Appearance and theme settings apply to all users.
Organization#
Configure how your organization is represented across the Starburst Enterprise web UI and AIDA:
Organization name: The name used for any references to the organization throughout the Starburst Enterprise web UI and AIDA. The maximum length is 255 characters.
Logo icon: The icon displayed in the navigation menu. Square dimensions are recommended. The logo icon is displayed at 24×24 pixels. The maximum file size is 100 KiB. Supported formats:
.png,.jpg,.jpeg, and.svg.
Login page#
Edit the following options to customize the login screen:
Login logo: The logo image file displayed on the login screen. The maximum file size is 100 KiB. Supported formats:
.png,.jpg,.jpeg, and.svg.Background image: The background image file for the login screen. The maximum file size is 5 MiB. Supported formats:
.png,.jpg,.jpeg, and.svg.Welcome text: Optional text displayed below the logo on the login page. The maximum is 300 characters.
Banner text: Optional text displayed on the login page in a separate banner. The banner message appears across the top of the login screen for logged out users. The maximum length is 300 characters.
Agent details#
Edit the following options to customize the agent chat interface:
Agent name: The name used to reference the agent within AIDA. The default maximum length is 255 characters.
Disclaimer text: A disclaimer message displayed in the AIDA chat interface. The maximum length is 300 characters.
Colors#
Edit the following options to customize the color theme used in AIDA:
Use default theme colors: When enabled, the AIDA portal uses the default theme colors. Click the toggle to set custom values for the Primary, Secondary, and Accent colors.
Note
The color theme is only applied to the AIDA portal. Customizing theme colors disables dark mode for all users.
Client token authentication#
The Starburst Enterprise web UI features an optional page that, if enabled, exposes a JWT token that can be used to connect to SEP with clients that support JWT authentication.
To enable this page, SEP must be configured with JWT authentication or
OAuth 2.0 authentication authentication. Set the following configuration property
to true in the coordinator’s config.properties file:
web-ui.token-copy.enabled=true
Users can access this page in a web browser by logging into the Starburst Enterprise web UI and
navigating to the /ui/token URL, such as
https://sep.example.com/ui/token.
Enable delegated Kerberos authentication#
The Starburst Enterprise web UI supports delegated Kerberos authentication. If enabled, users can use Kerberos authentication with the Starburst Enterprise web UI to access data sources that support Kerberos credential pass-through.
To enable delegated Kerberos authentication, set the following configuration
properties in the coordinator’s config.properties file:
http-server.authentication.type=DELEGATED-KERBEROS
http-server.authentication.krb5.service-name=HTTP
http-server.authentication.krb5.principal-hostname=${host_name}
http-server.authentication.krb5.keytab=${ENV:HTTP_SERVER_AUTHENTICATION_KRB5_KEYTAB}
web-ui.authentication.type=DELEGATED-KERBEROS
For any catalogs that are configured with Kerberos credential pass-through,
set the http-server.authentication.krb5.service-name catalog configuration
property to HTTP to match the Kerberos service name.
Additionally, you must configure your browser settings for Kerberos authentication. See your browser’s documentation for further details.
Legacy login#
You can disable the Starburst Enterprise web UI login and revert to the legacy Trino UI login by setting the following configuration in the
config.properties file:
sep-ui.security.disable-enterprise-login=true