ThoughtSpot #
ThoughtSpot Cloud is a browser-based analytics engine that lets you build queries by selecting the table columns that you want analyzed. ThoughtSpot then generates SQL code to implement that query, sends the SQL to the data source, then returns results in grid or graphical form.
ThoughtSpot-generated queries integrate well with tables and views managed by Starburst Galaxy and Starburst Enterprise platform (SEP) clusters.
Requirements #
ThoughtSpot provides a built-in Starburst data connector. The requirements for using this connector in ThoughtSpot Cloud are:
-
Users of ThoughtSpot Cloud must connect to a cluster running Starburst Galaxy or SEP version 354-e or newer.
-
Other ThoughtSpot Cloud requirements are described in the ThoughtSpot documentation.
Add a cluster connection #
Use the following steps to connect to ThoughtSpot and add your cluster as a data source:
-
Determine the connection information for your cluster, including its network name, port, and your login credentials.
-
Using a supported web browser, log into ThoughtSpot using the URL and login credentials provided for your site by your network administrators. If you are evaluating ThoughtSpot and have trial login credentials, use
try.thoughtspot.cloud. -
To add a connection to your cluster, select Data in the navigation bar.
-
Select the Connections tab, then Add a connection.
-
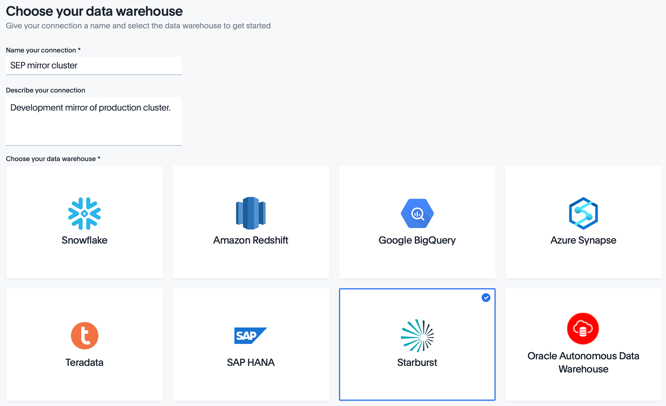
In the Choose your data warehouse page, in the first field, Name your connection, such as
production cluster. Optionally enter a connection description. -
Select the Starburst tile and click Continue.
-
Enter the connection details for your cluster. Leave the Database field empty.
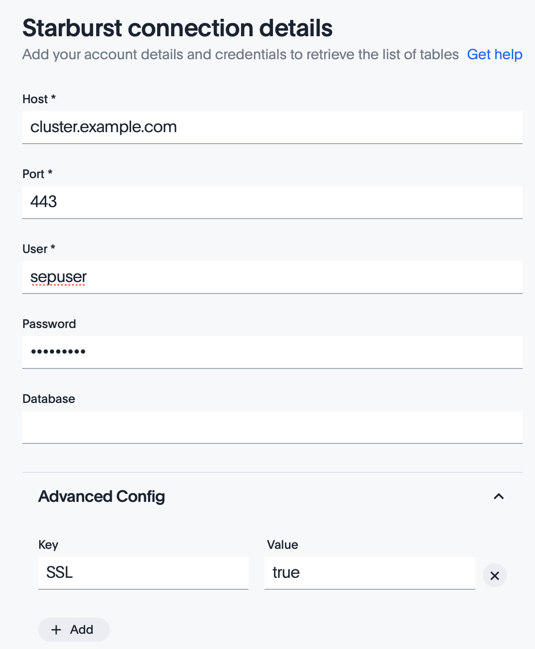
-
If your cluster uses secure TLS/HTTPS connections, open the Advanced Config drop-down. In the first row of Key and Value fields, enter
SSLandtrue. -
Click Continue.
-
In the Select tables page, ThoughtSpot connects to your cluster and returns a list of configured catalogs. Open a catalog entry to see the schemas and tables it contains.
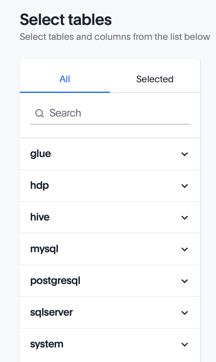
-
Use the checkboxes to select one or more tables on the left and columns on the right. Choose a set of tables and columns from which you can make meaningful queries by dragging column names into ThoughtSpot’s Search field.
You can return to this page under a different connection name to select another set of tables and columns to support a different set of queries. Therefore, do not select in this current named connection every table you might be interested in querying.
Note: After you click Confirm, the ThoughtSpot UI does not distinguish same-named tables from different catalogs. In general, try to select a collection of tables with unique names, unless you are configuring table joins in ThoughtSpot. However, see Join table options for our alternative way to handle table joins.
-
Click Confirm. This adds a named connection that includes only the tables and columns you selected.
You can now perform a live query on this connection, following the instructions in ThoughtSpot’s documentation.
To query a different set of tables and columns, create a different data connection to the same cluster.
Joining tables #
Use the ThoughtSpot Select tables UI to perform join operations, including joining tables across different data sources. ThoughtSpot generates a SQL query that specifies the joins and passes that to the SEP query engine, which is then responsible for analysis and execution of the query.
You can also create a view directly in SEP from a SELECT
query that includes the joins of interest. This allows you to select that view
by name in ThoughtSpot’s Select tables page, and issue queries on that view.
This is appropriate for a static set of joined tables that forms a platform for
many successive queries.
In both cases, ThoughtSpot generates the SQL for your analysis query and forwards that to SEP for execution.
To create a view of joined tables, use a SQL editor client such as the Trino CLI or the query editor in the Starburst Enterprise web UI.
Your cluster must have a Hive catalog that implements a Hive metastore service such as the AWS Glue Data Catalog, which serves as a location to store your created view.
The following example saves a view of a SELECT statement that accesses three
catalogs: postgresql, hive, and sqlserver.
CREATE VIEW hive.savedviews.income_by_customer_segment_vw AS
SELECT c.custkey,
       c.estimated_income,
       c.fico,
       o.risk_appetite,
       l.cc_type
FROM glue.burst_bank.customer c
   INNER JOIN postgresql.burst_bank.customer_profile o
     ON c.custkey = o.custkey
   INNER JOIN sqlserver.burst_bank.product_profile l
     ON o.custkey = l.custkey;
Resources #
- Lightning demo - ThoughtSpot and Starburst Video, 8 minutes
- Starburst Guide: Data sources and catalogs
- Starburst Guide: Starburst Enterprise web UI
Is the information on this page helpful?
Yes
No