Tableau Desktop #
Tableau Desktop can connect to Starburst Galaxy or SEP via the Starburst connector, ODBC connector, or JDBC connector.
Starburst connector #
-
Install Trino JDBC driver 469 or newer if you have not done so.
Download the latest Trino JDBC driver, and place it in the following location:
-
Windows: C:\Program Files\Tableau\Drivers
macOS: ~/Library/Tableau/DriversDo not store more than one Starburst JDBC driver in this directory. Delete any older drivers when you update to a newer version.
-
Install the latest Starburst connector if you have not done so.
a. Start Tableau Desktop, select Connect, To a Server, and More.
b. Type
Starburstin the search field and look for Starburst by Starburst in the list.If that option shows in the Additional Connectors category, this means the connector is not yet installed on your computer. Click Starburst by Starburst, which opens a Connector Details dialog that describes the data connector. Click Install and restart Tableau.
If the Starburst by Starburst opton shows in the Installed Connectors category, this means the connector is already installed on your computer. Click Starburst by Starburst, which opens the Starburst by Starburst connector dialog. Click the Information and Support link to find the current version.
The latest version of the Starburst connector is 1.5.1. If you already installed an older version but want the latest one, you must delete the previous connector named
StarburstJDBC-x.x.x.tacofrom the following folder, then install the latest one as described above.-
Windows: C:\Users\username\Documents\My Tableau Repository\Connectors
macOS: /Users/username/Documents/My Tableau Repository/Connectors -
Connect to Starburst Galaxy or SEP.
Start Tableau Desktop, select Connect, To a Server, More, then select Starburst by Starburst connector.
Fill in the connection dialog:
Field Value Server type Select Enterprise or Galaxy Server Hostname or IP address of your cluster Port (SEP clusters only) Port used by your cluster. Authentication Use the drop-down list to select among five options: - Username for a cluster with no authentication
- Username and Password for a cluster with a password-based authentication
- Kerberos
- Personal access token (JWT)
- Single sign on (OAuth)
If you select Kerberos, see Kerberos authentication. If you select OAuth, see OAuth 2.0 authentication. If you select Personal access token (JWT), see JWT authentication.Username Username. Password The password for the specified Username. Role Enter a role with appropriate access. Require SSL (SEP clusters only) Select this checkbox if your cluster has any authentication enabled. When selected, the following field appears. SSL Verification (SEP clusters only) Select an entry in the drop-down list to specify how rigorously the server’s certificate is to be validated.
The values for **SSL Verification** have the following meanings:- FULL
- Confirm that the certificate's validity is chained all the way back to a root Certificate Authority (CA).
- CA
- Confirm that the certificate is valid as far back as the included intermediate CA.
- NONE
- Confirm that the server's certificate matches the DNS name and private key of the server.
Click Sign in and finish authentication.
-
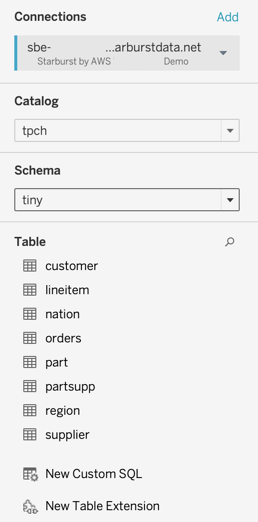
When the connection is made, the Connections panel shows a list of the catalogs configured in your cluster.
-
To see the available tables, select a catalog, then a schema from that catalog.
-
Select a table, or select multiple tables and specify relationships or joins.
OAuth 2.0 authentication #
To use OAuth 2.0 to connect to SEP or Starburst Galaxy, follow this instruction, and save the OAuth config file to the following folder:
-
Windows: C:\Users\username\Documents\My Tableau Repository\OAuthConfigs
macOS: /Users/username/Documents/My Tableau Repository/OAuthConfigs
Restart Tableau Desktop, connect to Starburst server using Starburst by Starburst connector. The new OAuth config shows in the OAuth Provider list.
Kerberos authentication #
When configuration a connection to a SEP cluster, if you choose Kerberos in the Authentication drop-down, additional connection options appear in the Connection dialog.

The Kerberos-specific fields are described in the following:
| Field | Value |
|---|---|
| Kerberos Principal | The Kerberos principal to use when authenticating to the SEP cluster. If not set, the value is read from the keytab file. |
| Kerberos Remote Service Name | SEP cluster Kerberos service name. This parameter is required for Kerberos authentication. |
| Kerberos Service Principal Pattern | SEP coordinator Kerberos service principal pattern. The default is ${SERVICE}@${HOST}. ${SERVICE} is replaced with the value of Kerberos Remote Service Name and ${HOST} is replaced with the hostname of the coordinator (after canonicalization, if enabled). |
| Kerberos configuration file path | Path to the local Kerberos configuration file. |
| Kerberos keytab file path | Path to the local Kerberos keytab file. |
Use the same paths for the keytab and configuration file that are used after publishing a SEP data source to Tableau. If they are not specified, default locations are used.
To troubleshoot Kerberos:
-
Set the
JAVA_TOOL_OPTIONSenvironment variable on the Tableau host to include:-Dsun.security.krb5.debug=true -Dtrino.client.debugKerberos=true \ -Djava.security.debug=gssloginconfig,configfile,configparser,logincontext -
Check the Tableau log files that have
jprotocolserverin their name, located in the\data\tabsvc\logs\dataserverdirectory on Tableau.
For further information on configuring and troubleshooting Kerberos on Tableau, see:
- Kerberos
- Enable Kerberos Run As Authentication for JDBC Connectors
- Enable Kerberos Delegation for JDBC Connectors
- Troubleshoot Kerberos
Impersonating Tableau Server or Cloud user #
If you use the Starburst connector, you can choose Impersonate via embedded
password authentication type for publishing a Tableau workbook or data source
to Tableau Server or Cloud. This allows Tableau to log in to the
Starburst server using the embedded username and password, and to
impersonate the Tableau Server or Cloud user that is running the Tableau
workbook.
To use Impersonate via embedded password, the catalog and user’s impersonation
permissions must be configured. See user
impersonation for more information.
ODBC connector #
-
Download and install the latest Starburst ODBC driver for your operationg system.
-
Open Tableau Desktop, select To a server, More…, then Other Databases (ODBC).
-
If you have created a DSN, select it from the DSN list. Otherwise, check Driver option, select “Starburst ODBC Driver”, and click Connect.
In the Starburst Login dialog, enter connection information and click OK. For more information about configuring Starburst ODBC connection, see DSN Configuration.
-
Tableau populates input fields as shown below, if the ODBC driver is able to make a successful connection using the information you provided in the previous step. Review the information and modify as needed, and click Sign In to establish the connection.
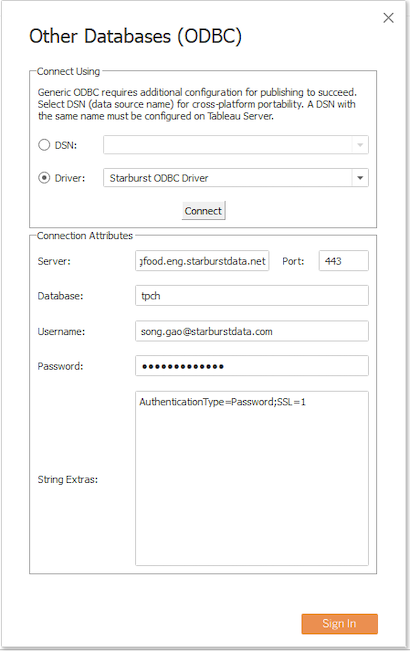
- Server: hostname or ip of Starburst Galaxy or SEP
- Port: the port number the server is using
- Database: (optional) the default catalog
- Username: Your username
- Password: Your password
- String Extras: (optional)
SSL=1;
The
String Extraslets you enter ODBC connection string parameters directly. For more information, please refer to corresponding ODBC driver doc.
The Tableau ODBC documentation contains further information.
JDBC connector #
-
Download the latest Trino JDBC driver.
-
Place the JDBC driver JAR file in the Tableau drivers directory:
-
Windows: C:\Program Files\Tableau\Drivers
macOS: /Users/username/Library/Tableau/DriversDo not store more than one Trino JDBC driver in this directory. Delete any older drivers when you update to a newer version.
-
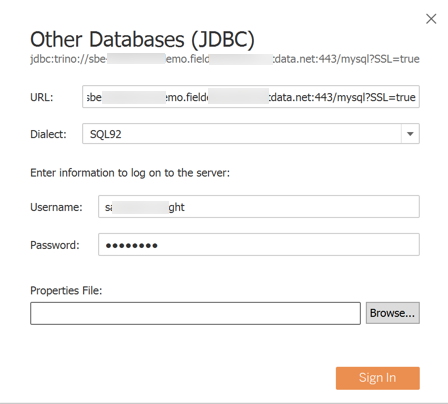
Start Tableau Desktop and select Connect to a server, More…, then Other Databases (JDBC).
-
Fill in the connection dialog as shown in the following table. For the URL field, use a JDBC connection string in this format:
jdbc:trino://cluster.example.com:8443/catalog?SSL=trueIf your cluster has TLS enabled, append the property
?SSL=trueto the connection string.Field Value URL Full JDBC connection string for your cluster. Dialect Must be 'SQL92' Username Your username Password Your password Properties File Specify or browse to the path of a JDBC properties file containing further specifications for this connection. See Customized JDBC Connections. You can add extra parameters to the JDBC URI. See the SEP JDBC documentation for more information the available parameters.
Federated queries #
Tableau allows cross-join tables from different databases and catalogs. However, separate queries are sent to different catalogs, and joins are locally processed on the Tableau side after data retrieval.
To leverage the data federation capability of Starburst servers, you can
use Tableau’s Custom SQL to query multiple catalogs.
After logging in Starburst servers, select a catalog and a schema, then
select New Custom SQL. To reference tables from any
catalogs, use the fully-qualified name in the formcatalog.schema.table.
The following example query accesses four catalogs: postgresql, hive,
mysql, and sqlserver.
SELECT c.custkey
  , c.state
  , c.estimated_income
  , cp.customer_segment
  , a.cc_number
  , pp.cc_type
  , a.mortgage_id
  , a.auto_loan_id
FROM postgresql.burst_bank.customer c
JOIN hive.burst_bank.account a on c.custkey = a.custkey
JOIN mysql.burst_bank.product_profile pp on a.custkey = pp.custkey
JOIN sqlserver.burst_bank.customer_profile cp on c.custkey = cp.custkey
WHERE c.country = 'US'
AND c.state NOT IN ('AA', 'AE', 'AP')
Is the information on this page helpful?
Yes
No