DSN configuration #
The Starburst ODBC driver V3 series is described in the following pages:
- Overview
- Install ODBC V3 for Windows
- Install ODBC V3 for MacOS or Linux
- This page — DSN configuration
- Using connection strings
- Connection string keywords
- Mapping V2 keywords
- Upgrading and rolling back
- ODBC V3 driver archive
This page provides instructions for creating and configuring a data source name (DSN) using the Starburst ODBC driver V3 series.
Before you continue, you must install the driver.
Create a data source name #
To create a data source name (DSN):
- From the Windows Start menu, search for ODBC Data Sources and select
either ODBC Data Sources (64-bit) or ODBC Data Sources (32-bit).
- Use the ODBC Data Source Administrator that matches your application’s bitness. Verify the bitness by checking the title bar.
-
In the ODBC Data Source Administrator:
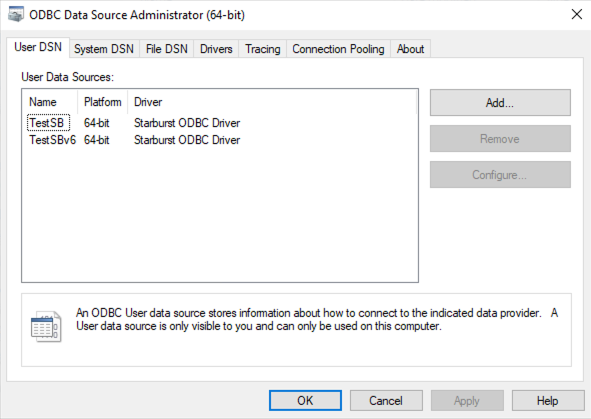
- Click the Drivers tab. Confirm that Starburst ODBC Driver appears in the list.
- Choose either:
- User DSN tab (for a DSN only the current Windows user can access)
- System DSN tab (for a DSN all users on this machine can access)
- Click Add.
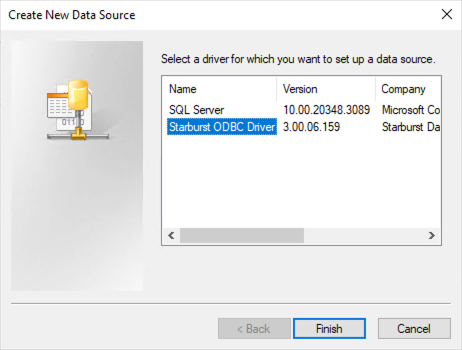
- In the Create New Data Source dialog, select Starburst ODBC Driver.
- Click Finish.
Connection settings #
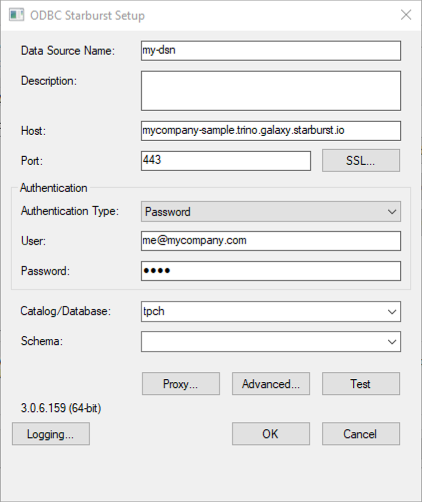
In the ODBC Starburst Setup dialog, configure the following settings:
- Data Source Name: A name for your DSN
- Host: The IP address or host name of your Starburst server
- For SEP, the IP address or host name of your coordinator
- For Starburst Galaxy, the fully qualified host name of your cluster (such
as
mycompany-example.trino.galaxy.starburst.io)
- Port: The TCP port number your Starburst server uses
- For SEP, usually
443(configurable) - For Starburst Galaxy, always
443
- For SEP, usually
- SSL: Opens the SSL configuration dialog
- SSL Verification: Controls how strictly the driver verifies the server’s
SSL certificate. Select one of the following options:
- None: The driver does not validate the server certificate
- CA: The driver validates that the certificate is issued by a trusted CA and is not expired
- Full: The driver validates the CA and expiration date, plus verifies that the IP/host name matches the certificate’s common name or Subject Alternative Names
- Trust Certificates: The path to a PEM file containing certificates for your Starburst server that are not trusted by the system truststore
- SSL Verification: Controls how strictly the driver verifies the server’s
SSL certificate. Select one of the following options:
- Authentication: From the Authentication Type drop-down menu, choose
from the following authentication types:
- None: No authentication required
- Password: Authenticate using a username and password
- Windows Integrated: Authenticate using the current Windows user’s credentials (Kerberos or NTLM)
- Windows Password: Authenticate using a specified username and password to generate Windows credentials
- JWT: Authenticate using a JSON Web Token (access token)
- OAuth2: Authenticate using the OAuth2 authentication flow
Note: Passwords must use ISO-8859-1 character encoding. Using characters outside this encoding causes authentication failures when connecting through the JDBC or ODBC driver. - Catalog/Database: The default catalog for unqualified or partially qualified object references (optional)
-
Schema: The default schema for unqualified object references (optional)
Proxy connection #
To configure a connection through a proxy server:
- In the ODBC Starburst Setup dialog, click Proxy Options.
- Select Use Proxy Server.
- Enter the Proxy Host (hostname or IP address).
- Enter the Proxy Port number.
- If necessary, enter Proxy User and Proxy Password.
- Optionally, in the Bypass proxy for domains/IPs field, enter a
comma-separated list of domains or IP addresses that do not require a proxy.
- The driver matches each entry as either a domain that contains the
hostname, or the hostname itself. For example,
example.commatches bothexample.comandwww.example.com, but it does not matchexample.org. You can specify IP addresses using CIDR notation.
- The driver matches each entry as either a domain that contains the
hostname, or the hostname itself. For example,
- To save your proxy settings, click OK.

Advanced options #
In the ODBC Starburst Setup dialog, click Advanced Options to configure additional settings:
- Allow HTTP Redirect: Enable to allow the driver to follow HTTP redirects for all HTTP requests throughout the connection lifecycle.
- Allow Metadata from Multiple Catalogs: Enable to allow metadata to be
retrieved from other catalogs in addition to the catalog specified via the
Catalogoption when the driver makes a call toSQLTablesorSQLColumns. This option works only whenCatalogis specified. - Cache OAuth Token: This property applies to Windows only. When enabled, the access token is securely saved under the user’s temp directory and is reused across different apps, which avoids multiple OAuth windows when applications reconnect. If the same login account is used to run server applications or services, disable this option to prevent unintended token reuse across processes.
- Application Name: The name of the client application (sets the X-Trino-Source header).
- Client Tags: Comma-separated list of strings to use to identify resource groups
- Default Varchar Length: The default length of unbounded
varcharcolumns/parameters. - Extra Credentials: Comma-separated list of key-value pairs for connecting
to external services (such as
PG_UID:admin, PG_PWD:password) - KrbServiceName: The Kerberos service name used for SPNEGO auth. Change
only if your server’s service principal uses a name other than
HTTP. - Roles: Comma-separated list of key-value pairs to set roles for catalogs
(such as
system:public, tpch:read_only) - Session Properties: Comma-separated list of key:value pairs for session
properties (such as
query_max_run_time:10m, task_mask_writer_count:16) -
Timezone ID: The timezone ID to use to process query data (such as
America/New_York). If not specified, the system timezone on the client computer is used.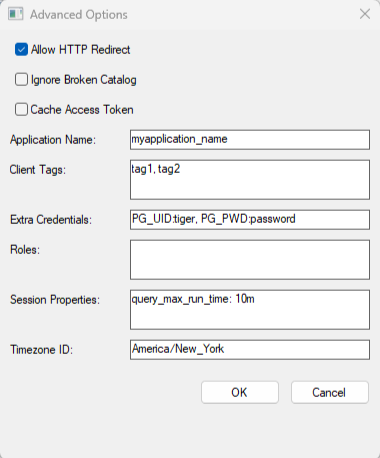
Testing your connection #
After configuring your basic settings:
- In the ODBC Starburst Setup dialog, click Test.
- If the test fails, review the error messages.
- When successful, click OK.
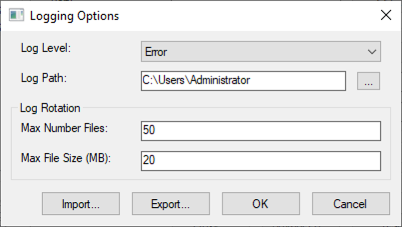
Logging options #
Enable logging to troubleshoot issues.
To configure logging options:
- In the ODBC Starburst Setup dialog, click Logging Options.
- From the Log Level drop-down menu, choose from the following options:
- Off: Disables all logging
- Fatal: Logs severe error events that cause the driver to abort
- Error: Logs error events that allow the driver to continue running
- Warn: Logs events that may result in an error if you do not take action
- Info: Logs information that describes the driver’s progress
- Debug: Logs detailed information to use for debugging the driver
- Trace: Logs all driver activity
- In the Log Path field, select a folder to store log files.
- In the Max Number Files field, enter the maximum number of log files to retain.
- In the Max File Size field, enter the maximum size of log files in megabytes (MB).
- Click OK to save your settings.
Is the information on this page helpful?
Yes
No