Create, edit, and delete Galaxy clusters #
You can create, view, and manage clusters in the Admin > Clusters pane.
List of clusters #
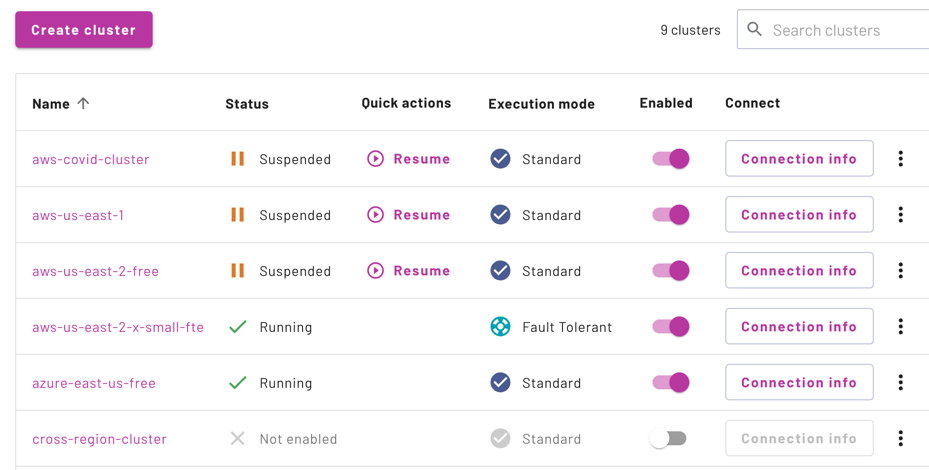
The cluster list displays the following information about each cluster:
- Name: The name of the cluster, used to identify a cluster in the user interface as well as in the connection string for clients.
- Status: The current status of the cluster.
- Quick actions: Allows you to resume running an auto-suspended cluster.
- Execution mode: Displays the type of cluster: Standard, Fault-tolerant, or Accelerated.
- Enabled: A toggle switch to enable or disable a cluster.
- Partner connect: Click to go to partner connect where you can get the connection information required to connect to the cluster from various client tools.
The end of each row has an more_vert options menu with the following actions:
- Query: Opens the query editor using the current cluster as context.
- Resume: For suspended clusters only, lets you resume the cluster.
- Edit cluster: To edit the cluster.
- Change owner: To change the owner of the cluster to a different role
- View cluster activity: To view the recent activity of a running cluster.
- Clear result set cache: For clusters with result set caching enabled, lets you delete all cached query results.
- Delete cluster: To delete the cluster entirely.
The Name, Status, and Execution mode columns can be sorted. Click the column name to sort the column; click the name again to reverse the sort order. The up arrow_upward or down arrow_downward arrows show ascending or descending sort order.
Create a cluster #
To create a cluster, click Create cluster and proceed with the following steps:
-
Provide a meaningful name for the cluster in the Cluster name field.
-
Add one or more Catalogs to the cluster. The catalogs must use the same cloud provider.
-
Choose a Cloud provider region for deploying the cluster.
-
In the Execution mode drop-down menu, select from the available cluster types: Standard, Fault tolerant, or Accelerated.
-
In the Size section:
-
Select a size for the cluster using the slider or by entering a numeric value between
0and20in the text input field. -
Optionally select the Autoscaling enabled checkbox to use autoscaling. This adds a second text input field and slider endpoint so you can set a minimum and maximum number of worker nodes to scale between.
-
Optionally select Replicate cluster to enable deployment set routing. Use the text input field or slider to set the number of replicated clusters that you want to create. This option is unavailable if autoscaling is enabled.
-
-
Optionally select toggle_on Cache query results for improved query performance and input a duration for Cache reuse period for query result caching.
-
Select a value from the Uptime drop-down menu to set an auto-suspend time for the cluster.
-
In the Access section, use the Roles drop-down menu to select roles to give access to the cluster. If you do not specify a role, only the Public role can access the cluster.
-
Click Create cluster to save the configuration to the cluster list.
Optionally, proceed to enable the cluster and configure a cluster schedule.
Search clusters #
Use the search field to locate clusters by cluster name or catalog name.
Enable a cluster #
Click Enable in the cluster list.
An enabled cluster can automatically transition between running and suspended status depending on a defined cluster schedule.
Disable a cluster #
Disabling a cluster stops the cluster and immediately terminates all currently running queries.
In the Enabled column of the cluster list, click the enabled toggle to off. You are prompted to confirm disabling the cluster. The Status column displays Not enabled.
A cluster not currently enabled must be re-enabled manually. Any defined cluster schedule does not automatically enable a cluster.
To delete a cluster, you must disable it first.
Edit a cluster #
To open the Edit cluster panel, click the more_vert options menu, and select Edit cluster.
You can edit the cluster name, catalogs, cluster type, execution mode, and the auto-suspend time without affecting your users or any running queries. How changes take effect depends on the status of your cluster.
Not enabled: Configuration changes for a disabled cluster are applied immediately and are displayed in the cluster list. The new configuration is used when the cluster is re-enabled.
Suspended: Configuration changes for a suspended cluster are applied immediately and are displayed in the cluster list. The new configuration is used when the cluster is resumed.
Running: Configuration changes for a running cluster opens a dialog offering the following choices:
-
Yes, update now: If you choose this option, queries running on the existing cluster finish, and a new cluster with the updated configuration is used for all new queries.
-
No, update later: If you choose this option, an update button appears under Quick actions in the cluster list. Click the button once you are ready to apply the changes. Until then, the cluster continues to run using the current configuration. If you have an auto-suspend time configured, the cluster automatically transitions to suspended status once that time arrives. The new configuration is used when the cluster is resumed.
Right after editing a cluster’s configuration, its status can show as Updating until the configuration changes are complete.
Delete a cluster #
Before you can delete a cluster, you must disable the cluster in the cluster list. After the cluster is no longer enabled, click the more_vert options menu, then choose Delete cluster. Alternatively, you can open the edit cluster panel and click Delete cluster.
Is the information on this page helpful?
Yes
No