Azure SCIM setup #
System for Cross-domain Identity Management (SCIM) is a standard protocol for automating the exchange of user identity information between identity domains. Starburst Galaxy supports SCIM to allow an SSO identity provider to push user and group membership changes to Galaxy. Thus, Galaxy can accept an identity provider’s database of users and groups as its own.
Currently, the Azure SCIM implementation does not push user passwords to Galaxy.
Configure SCIM #
To complete the setup of Azure as the SSO identity provider for
Starburst Galaxy, follow the steps on this page. This procedure presumes you
have Galaxy open and are logged in with accountadmin rights, and
that you have completed the steps on Azure SAML
setup.
-
In Galaxy, go to the Access > Single sign-on pane, which is left unfinished at the end of the Azure SAML setup page and click Provision SCIM.
You might also land on the Single sign-on pane by clicking Provision SCIM on the Groups page.
-
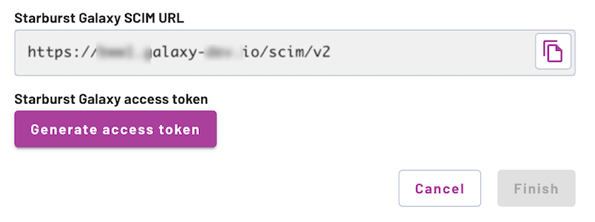
Click Generate access token.
Do not click Finish or navigate away from this pane yet!
If you do leave this page, you cannot restore this generated access token, but you can always create another token and provision that one. During this procedure, consider making a safety copy of the token until you finish setting up the IdP side of SCIM.
-
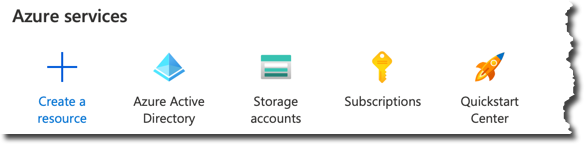
In the Azure portal, in Azure services, select Micrsoft Entra ID.
-
In the navigation menu, select Enterprise applications.
-
Locate the application you added on the Azure SAML setup page, probably named Starburst Galaxy, and click its name.
-
In the Overview page for this app, click the Provision User Accounts tile (or click Provisioning in the navigation menu).

-
Click Get started in the Provisioning welcome pane.
-
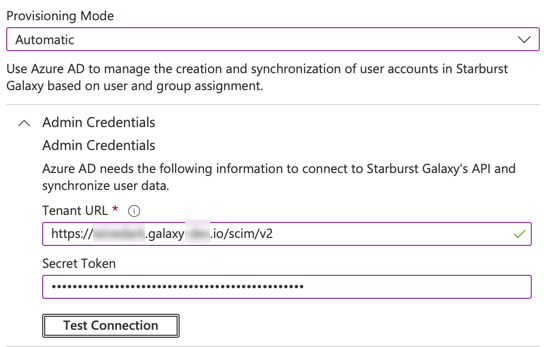
In the Provisioning pane, select Automatic from the Provisioning Mode drop-down.
-
From Galaxy, copy the URL in the Starburst Galaxy SCIM URL field to the Tenant URL field in Azure.
-
From Galaxy, copy the Starburst Galaxy access token value to the Secret Token field in Azure.
-
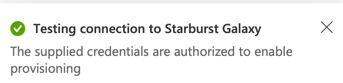
In Azure, click Test Connection. Look for a success dialog confirming that that Azure is now authorized to provision Starburst Galaxy.
-
Click Save.
-
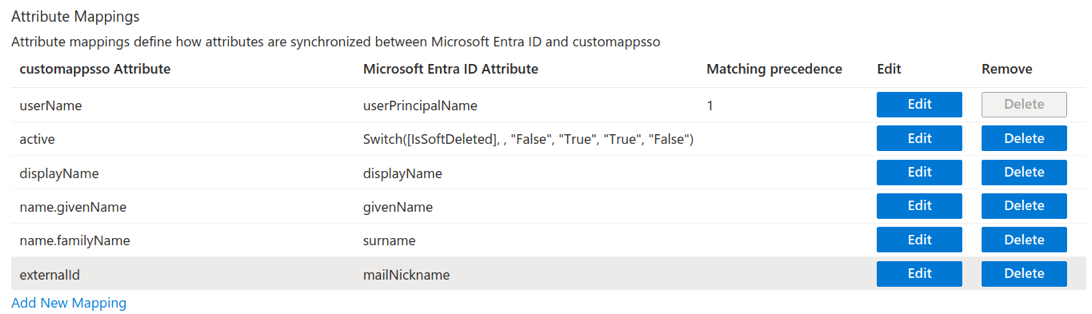
Optional. Galaxy supports a subset of all SCIM fields. After clicking Save on the same page, a Mappings drop-down menu appears, which allows you to configure how Entra ID fields are mapped to SCIM fields. Note that Entra ID does not support the password field. See SCIM support for a list of the SCIM fields that Galaxy supports.
Finish SCIM setup in Galaxy #
In the browser window holding Starburst Galaxy, the Provision SCIM pane is still open.
-
Click Finish.
-
Navigate to Access > Users and leave this browser window open. As provisioning proceeds from Azure, you can expect to see user names you authorized for Galaxy access in Azure to begin populating the Users list.
Start SCIM provisioning #
-
Start again in Azure > Microsoft Entra ID > Enterprise applications. Click the name of your Starburst Galaxy app.
-
In the navigation menu, click Provisioning.
-
If the Provisioning Mode pane is still open from the end of the Configure SCIM section, close that pane by clicking the X link in the upper right corner.
-
The main Provisioning pane now shows status and management links for the process that runs periodically to update Galaxy with any changed user and group information.
On this page, click Start provisioning and give it some time to run.
-
Come back to this page to check the status of the initial provisioning cycle. The provisioning logs do not report any activity until the initial cycle has run.
-
Expand the View provisioning details section to see the provisioning interval. If this is too long and you’d like to provision users immediately, navigate to the Provision on demand tab. Search for the name of a user or group as known to Azure, then click Provision. The On-demand provisioning in Microsoft Entra ID guide may be helpful.
-
The results of successful provisioning are that the Access > Users list in Galaxy now contains the user email names of the users you authorized in Azure to use Galaxy.
To distinguish an Azure-provisioned username from a direct-entered one, click the more_vert menu for that name. An Azure-provisioned name has the last two options dimmed, and shows a usage note if you hover over either of those options.

Login from Galaxy #
Do not test logging in to Galaxy with an Azure user name until:
-
You see in the Azure portal that the Start provisioning initial cycle has completed.
-
You see in Galaxy that the Access > Users list shows user names provisioned from Azure.
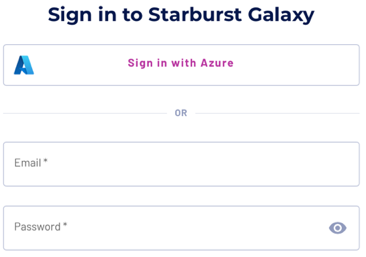
When these conditions are met, log out of Starburst Galaxy and try to log back in. On the login page, you now have an Azure option for signing in.
Click the Azure button and log in to Azure with the username you assigned to the app integration in Azure.
Usage notes:
-
Azure logins to Galaxy work best with the Chrome browser.
-
If your current browser has no history of logging in with a Microsoft or live.com account, you may need to use the Sign-in options on the Microsoft login dialog. Select Sign in with a work account and enter the URL of your Microsoft Entra ID (formerly Azure Active Directory) account. Note that Azure may have generated a URL for you in the
onmicrosoft.comdomain. Locate the Primary domain name in the Properties page for your Entra ID account at portal.azure.com.
You can also use Microsoft’s My Apps dashboard. Open myapps.microsoft.com and log in with a Galaxy-enabled username. Look for the Starburst Galaxy icon in the list of apps. Click that icon to open Galaxy without further prompts. If you have logged in with more than one enabled username in the current browser, the Pick an account dialog opens first.

Logging in with a previously configured, non-Azure email name and password is still available and still valid despite the availability of Azure-provisioned logins. You can eventually reduce the number of direct-configured email name logins to a few trusted administrative names.
Is the information on this page helpful?
Yes
No