Configure a live table from a file #
Ingest data from JSON files or CSV files in an AWS S3 bucket location into a managed Iceberg table, also known as a live table.
Live tables are stored in your AWS S3 bucket and can be queried as part of a Starburst Galaxy cluster, or by any query engine that can read Iceberg tables.
This page walks you through configuring a live table in three steps:
- Step 1: Connect to a stream source
- Step 2: Land your data in a raw table
- Step 3: Create a transform table and schematize data
Getting started #
Review the guidelines on key configurations and see the prerequisites section for requirements.
Prerequisites #
Galaxy’s file ingest is supported on Amazon Web Services. You must provide:
- An Amazon S3 Standard tier storage location for which you have read and write access.
- An AWS AWS cross-account IAM role to allow access to the S3 bucket.
- An S3 catalog configured to use cross-account IAM role credentials or an AWS access key ID and secret access key.
- A Galaxy S3 catalog configured to use an AWS Glue metastore or a Starburst Galaxy metastore.
-
A Galaxy cluster located in one of the following AWS regions:
- us-east-1
- us-west-2
- ap-southeast-2
- eu-west-1
To inquire about support for other regions, Starburst Support.
Galaxy ingests compressed or uncompressed newline deliminated JSON (NDJSON) files.
The files are subject to the following constraints:
- Maximum 10GB for a single file
- Maximum 20,000,000 file limit in the source path
To adjust file ingest limits, Starburst Support.
Connect to a source #
To begin ingesting file data, click Data > Data ingest in the navigation menu.
The Data ingest pane provides an overview of streaming resources, organized into Data sources, Live tables, and Schema registries tabs.
Click Connect new source, then select the Amazon S3 source.
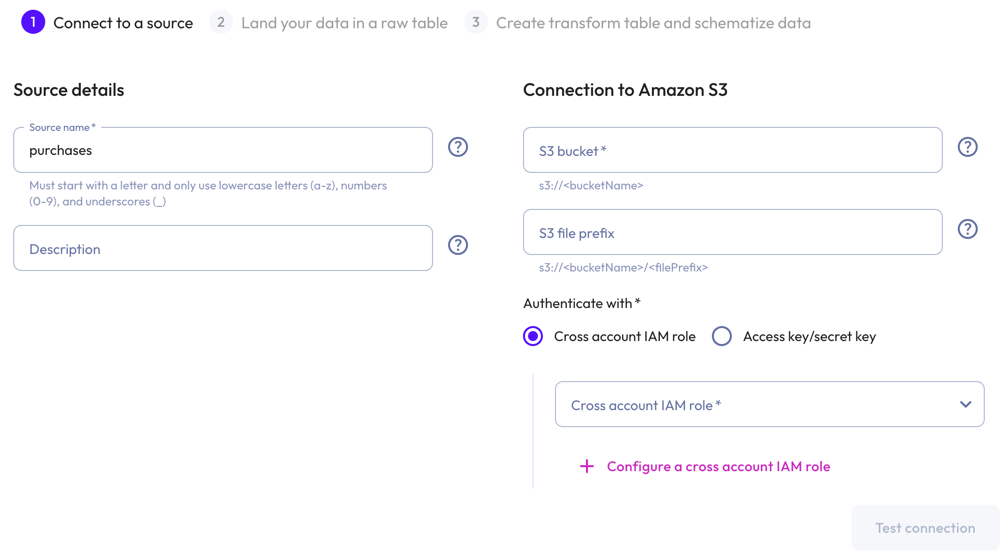
In the Connect new Amazon S3 dialog:
-
In the Source details section, enter a name for the source and a description.
-
In the Connection to Amazon S3 section, enter the name of the S3 bucket, and the S3 file prefix.
Live tables created using this source specify an exact location under the prefix. If you are creating multiple file ingest live tables, we recommended choosing a prefix which points to the root of all the files you want to ingest.
-
To authenticate with an API key/API secret pairing, enter an API key and an API secret in the respective fields.
-
To authenticate with a cross-account IAM role:
- Select a cross-account role from the drop-down menu.
- To configure a cross-account IAM role, click add
Configure a cross account IAM role.
-
-
Click Test connection to confirm that you have access to the source. If the test fails, check your entries, correct any errors, and try again.
-
If the connection is successful, click Save new source
Land your data in a raw table #
-
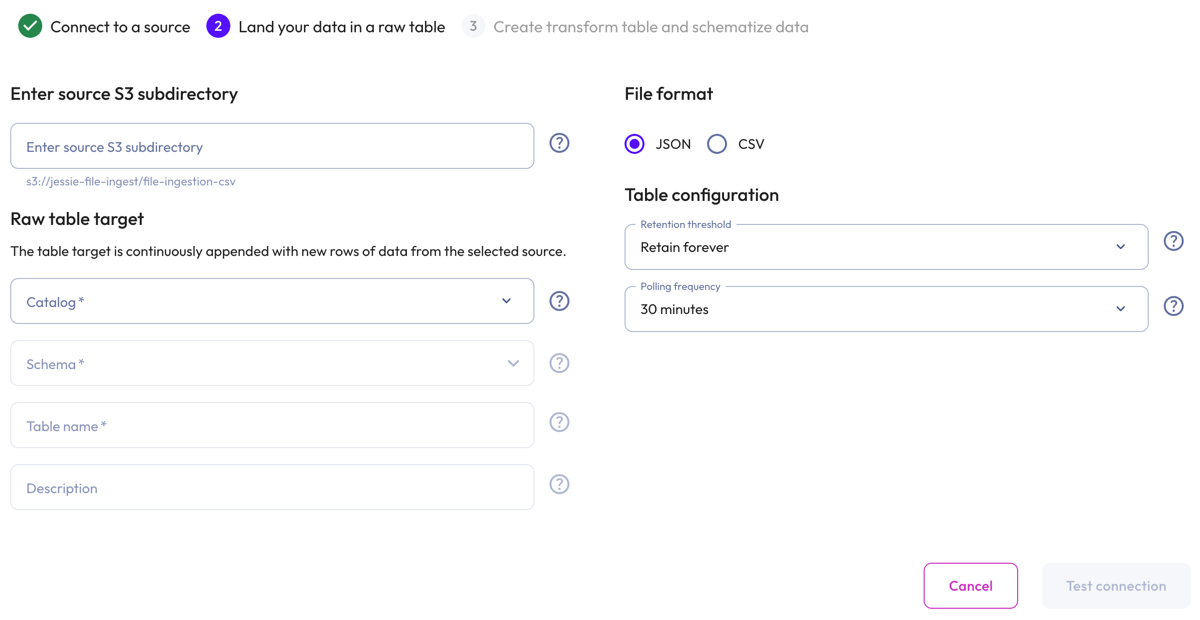
In the Enter source S3 subdirectory section, you have the option to limit ingestion to a subdirectory with your S3 bucket. To do this, enter the source S3 directory.
-
In the Raw table target section:
- Select a Catalog and Schema from the respective drop-down menus.
- Provide a Table name and Description. Tables cannot have the same
name. Use the query editor and the
DROPstatement to remove the existing table.
-
In the File format section, select either the JSON file format or the CSV file format.
JSON file data #
-
In the Table configuration section:
-
Set a data Retention threshold: By default, Retain forever is preselected to specify that all data is to be stored in the live table indefinitely. Select a different value to specify how long data is retained before it is automatically purged: 1 day, 7 days, 14 days, 30 days, or 90 days.
-
Set a Polling frequency to detect new files every 30, 60, 90, or 120 minutes.
-
-
Click Test connection to confirm that you have access to the data. If the test fails, check your entries, correct any errors, and try again.
-
If the connection is successful, click Save raw table.
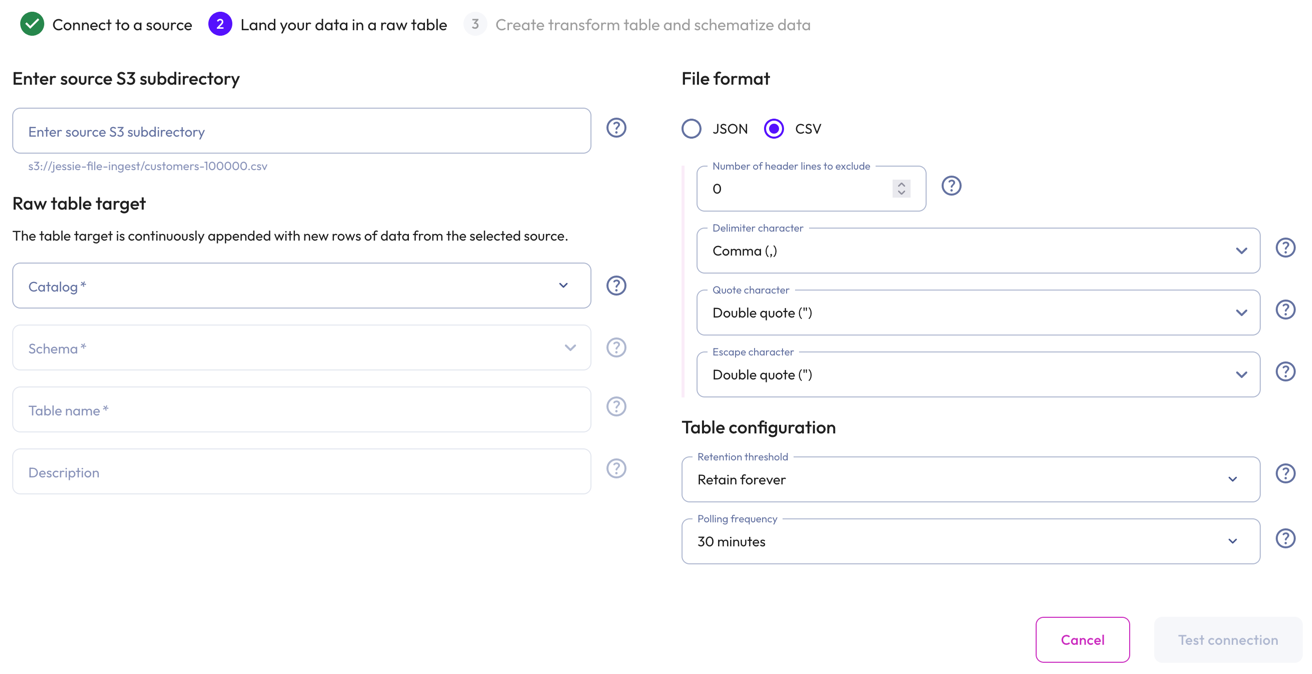
CSV file data #
-
For the CSV file format selection:
- Set Number of header lines to execlude.
- Choose a Delimiter character:
- Comma: The standard CSV delimiter.
- Tab: For tab-separated values.
- Pipe: For pipe-separated values.
- Semicolon: For semicolon-seperated values. Commonly used in European locales.
- Choose a Quote character: The standard Double quote character or the alternative Single quote if your file was generated with a different quote character.
-
Choose an Escape character: Double quote uses the RFC 4180 standard. Select Backslash if your data was generated with backslash escapes.
-
In the Table configuration section:
- Set a data Retention threshold: By default, Retain forever is
preselected to specify that all data is to be stored in the live table
indefinitely. Select a different value to specify how long data is retained
before it is automatically purged: 1 day, 7 days, 14 days, 30
days, or 90 days.
-
Set a Polling frequency to detect new files every 30, 60, 90, or 120 minutes.
-
Click Test connection to confirm that you have access to the data. If the test fails, check your entries, correct any errors, and try again.
-
If the connection is successful, click Save raw table.
Create a transform table and schematize data #
Transform your raw data into structured data, then define a schema for your data.
You can create a transform table now or later through the raw table options in Live Table Management.
To create a transform table now, proceed to Transform and schematize data.
Transform file data #
-
In the Transform table target section:
- Select a Catalog and Schema from the respective drop-down menus.
- Provide a Table name and Description. Tables cannot have the same
name. Use the query editor and the
DROPstatement to remove the existing table.
-
In the Table configuration section:
-
Set a data Retention threshold: By default, Retain forever is preselected to specify that all data is to be stored in the live table indefinitely. Select a different value to specify how long data is retained before it is automatically purged: 1 day, 7 days, 14 days, 30 days, or 90 days.
-
Choose an Error handling policy: Continue continues the ingestion process and writes any records that fail to parse to the errors table. Pause and notify stops the ingestion process if any parsing errors occur.
-
-
Click Validate data. If the test fails, check your entries, correct any errors, and try again.
-
Click Next.
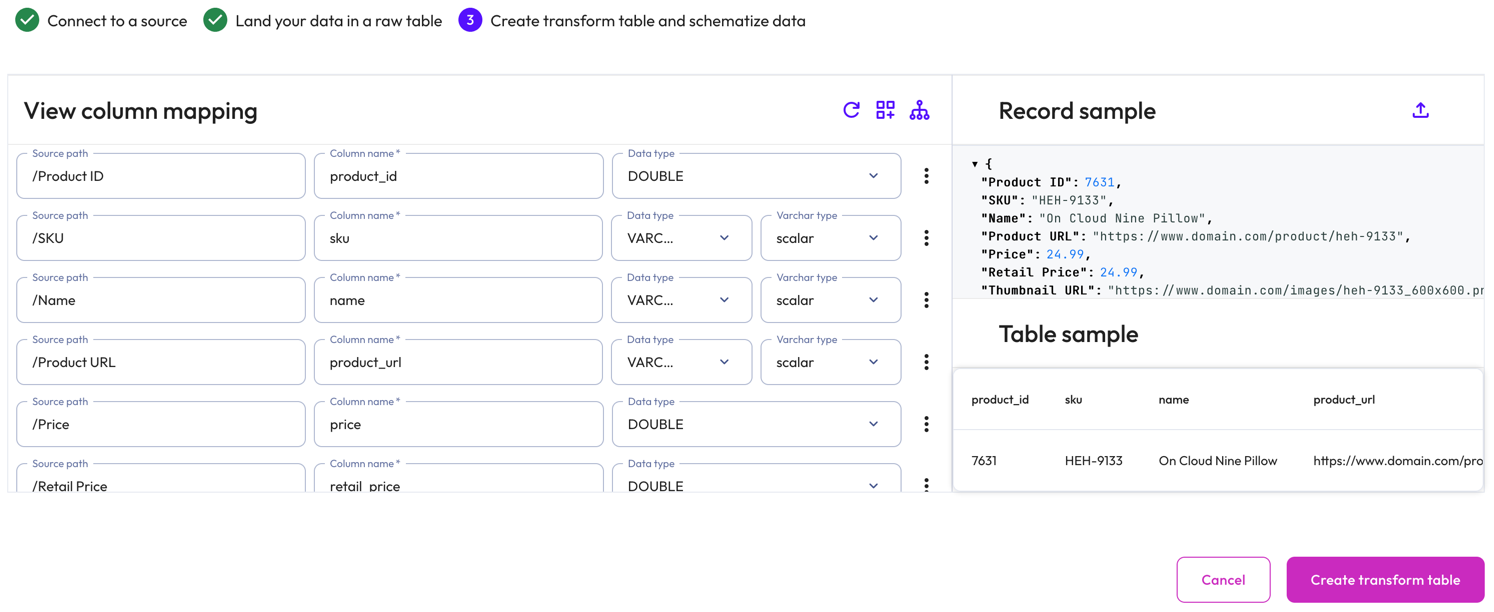
Schematize JSON file data #
Starburst Galaxy automatically suggests a schema by inferring from the JSON file. Modify the inferred schema by changing field entries and adding and removing columns.
Use the Edit column mapping panel to map the following columns:
- Source path: The location of the record information within the JSON row.
- Column name: Provide a column name for the live table.
- Data type: Specify a data type for the live table column.
- Varchar type: For a
VARCHARtype, specify aSCALARor JSONVARCHARtype. ForTIMESTAMPandTIMESTAMP WITH TIMEZONEtypes, specify aiso601orunixtimetype.
Use themore_vertoptions menu at the end of each row to add or remove columns.
Perform the following actions from the header:
-
refresh Reload detected columns: Restore any altered field entries to the original inferred values.
- In the Reload detected columns dialog, click Yes, reload to reload
detected columns and discard any unsaved changes to column configurations.
This action cannot be undone. Otherwise, click No, do not
reload.
- In the Reload detected columns dialog, click Yes, reload to reload
detected columns and discard any unsaved changes to column configurations.
This action cannot be undone. Otherwise, click No, do not
reload.
-
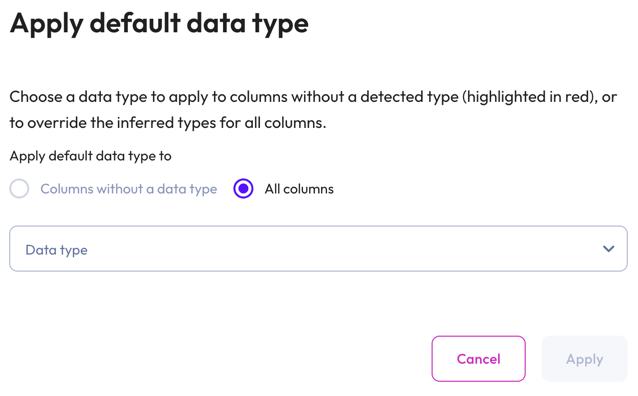
dashboard_customize Set default type: Apply a data type to columns without a detected type or override the inferred types for all columns.
- In the Apply default data type dialog, select Columns without a data type to apply a data type to columns without a detected type (these columns are highlighted in red). Select All columns to override the inferred types for all columns.
- Choose a data type from the data type drop-down menu.
-
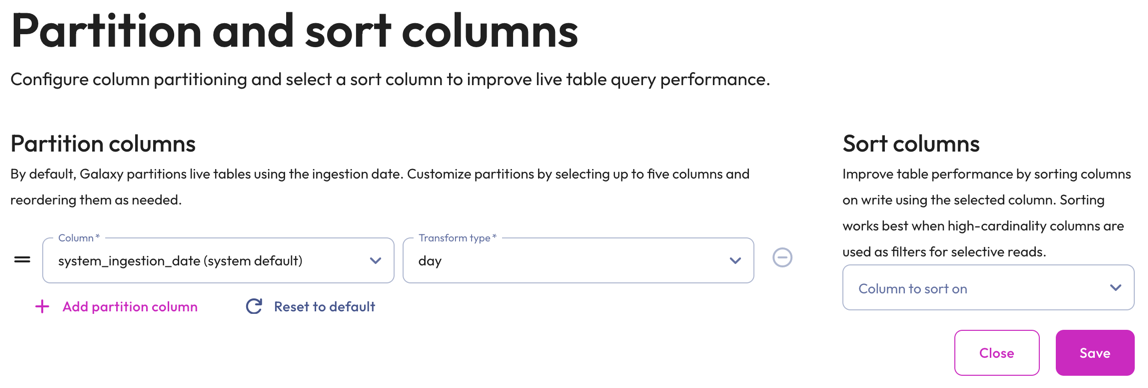
graph_2 Partition and sort columns: Customize partitions and sort columns.
-
In the Partition columns section, select a Column and Transform type from the respective drop-down menus. Transform types change depending on the column. For the bucket transform type, the number of buckets must be between 2 and 512.
Partition changes are applied to new data immediately, while existing data is updated during the next compaction run.
Partition evolution is not supported.
- In the Sort columns section, choose a column from the drop-down menu.
- To add up to five partition columns, click addAdd partition column.
- To arrange columns, use the drag_handle handle to drag and drop.
- To delete added partitions and reset to the default partitions, click refreshReset to default.
- To remove a column, click do_not_disturb_on.
-
The Record sample panel shows the message sample used to generate the columns. If your file has no data for Galaxy to infer, you can manually enter a new sample by clicking upload. Type or paste the new sample in the text area then click Load sample.
The Table sample panel previews the mapped table.
To complete the configuration, click Create transform table.
Data ingest begins in approximately 1-2 minutes. You can run SELECT queries on
the live table like you would on any other table.
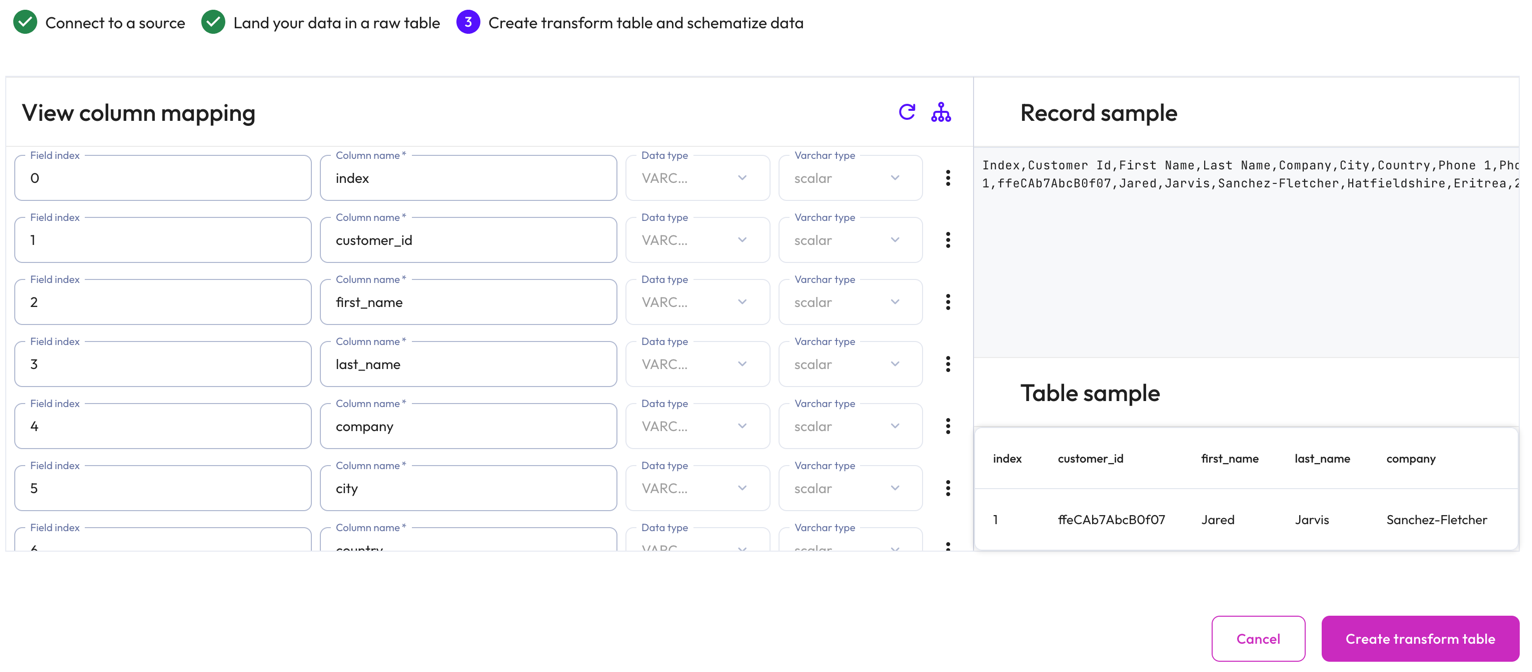
Schematize CSV file data #
Starburst Galaxy automatically suggests a schema by inferring from the CSV file.
The View column mapping panel displays mapped data in the following columns:
- Field index: The position number of the field within the row.
- Column name: The column name for the live table.
- Data type: The data type for the live table column.
- Varchar type: The varchar type.
Use themore_vertoptions menu at the end of each row to add or remove columns.
Perform the following actions from the header:
-
refresh Reload detected columns: Restore any altered field entries to the original inferred values.
- In the Reload detected columns dialog, click Yes, reload to reload
detected columns and discard any unsaved changes to column configurations.
This action cannot be undone. Otherwise, click No, do not
reload.
- In the Reload detected columns dialog, click Yes, reload to reload
detected columns and discard any unsaved changes to column configurations.
This action cannot be undone. Otherwise, click No, do not
reload.
-
graph_2 Partition and sort columns: Customize partitions and sort columns.
-
In the Partition columns section, select a Column and Transform type from the respective drop-down menus. Transform types change depending on the column. For the bucket transform type, the number of buckets must be between 2 and 512.
Partitioning of
DOUBLEandREALcolumns is not supported. Change the data type to a supported column type.Partition changes are applied to new data immediately, while existing data is updated during the next compaction run.
Partition evolution is not supported.
- In the Sort columns section, choose a column from the drop-down menu.
- To add up to five partition columns, click addAdd partition column.
- To arrange columns, use the drag_handle handle to drag and drop.
- To delete added partitions and reset to the default partitions, click refreshReset to default.
- To remove a column, click do_not_disturb_on.
-
The Record sample panel shows the message sample used to generate the columns.
The Table sample panel previews the mapped table.
To complete the configuration, click Create transform table.
Data ingest begins in approximately 1-2 minutes. You can run SELECT queries on
the live table like you would on any other table.
Best practices #
Adhere to the following recommendations to ensure the best results when ingesting file data.
-
Confirm that the source JSON files contain newline delimited (NDJSON) records before attempting to create a live table schema mapping or before attempting to ingest file data into a live table.
-
Place each source file in its own folder to ensure proper identification during ingestion.
-
Verify that the data in the source files was successfully ingested into the live table before purging it. If Galaxy has not ingested a file after several polling intervals have transpired, check the errors table for any detected errors.
-
Exceeding the 20,000,000 file limit stops the ingestion process. Ensure that the total number of files in the S3 source path does not exceed the maximum limit by deleting files from the S3 source location after they have been successfully ingested.
Security #
Any modifications made to the data or metadata files may corrupt the Iceberg table. Starburst Galaxy cannot ingest to or manage data in a corrupted table.
- Recommended
-
- Apply the principles of least privilege to users who are granted permissions to perform operations on data in the S3 bucket where Iceberg tables are stored.
- Place Iceberg managed tables in a separate bucket with tighter AWS governance.
Next steps #
Is the information on this page helpful?
Yes
No