SQL jobs #
SQL job scheduling is best suited for executing operational SQL statements, such
as CREATE, DROP, REFRESH, MERGE and TRUNCATE. Statements that return
results are not supported, such as statements that begin with SELECT; however,
using SELECT as part of a statement is supported.
A SQL job can include up to 10 queries, each of which can contain a single statement. The queries run sequentially. If a single query in a job fails, Galaxy re-tries the query once. If it fails again, Galaxy pauses the job and sends a notification. From the Job details pane, you can try to re-run a failed job; it will also run again according to its schedule.
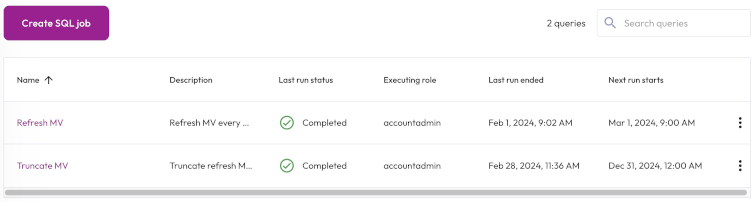
To create a SQL job, click Jobs in the navigation menu. The SQL tab is where you create, view, search for, edit, and delete SQL jobs.
The SQL jobs list is organized in the following columns:
- Name: The name of the SQL job. Click the column heading to sort in ascending or descending alphabetical order.
- Description: The description provided for the SQL job.
- Number of statements: The number of SQL statements included in the job.
- Last run status: When the SQL job was last run.
- Executing role: The role running the SQL job.
- Last run ended: The date and time the last SQL job run ended.
-
Next run starts: The next date and time the SQL job is scheduled to start running. If the schedule is paused, the status of the schedule also appears here.
Create a SQL job #
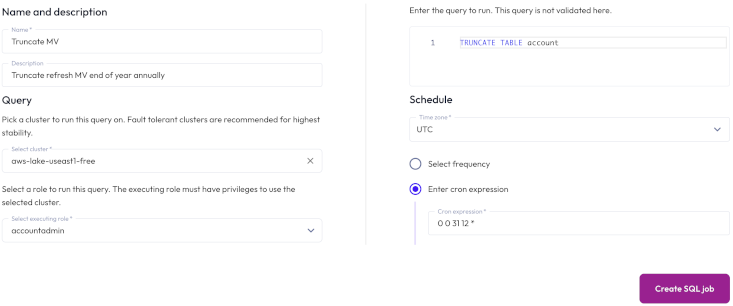
To run a statement on a recurring schedule, click Create SQL job, then provide the following information in the Create SQL Job dialog:
-
In the Name and description section, enter a name for the job and a useful description.
-
In the Query section, click + Add query and enter the single statement that you want to run in the Write SQL statement dialog that appears.
-
Click Validate SQL to validate the statement, then click Save.
-
If you want your job to contain multiple queries, click + Add query again and repeat the validation process for each statement.
-
In the Execution details section:
-
In the Executing role menu, select a role to run the statement. The role must have the Manage Security privilege.
-
In the Select cluster field, choose a cluster to run the statement on. Starburst recommends using a fault tolerant cluster.
-
-
In the Job schedule section:
-
Choose the time zone of your operating system from the drop-down menu.
-
Choose the Select frequency or Enter cron expression recurring interval format.
For Select frequency: Choose an hourly, daily, weekly, monthly, or annual schedule from the drop-down menu. The corresponding values depend on the schedule selected:
Hourly: Enter a value between 1 minute and 59 minutes.
Daily: Enter a time in the formathh:mm, then specify AM or PM.
Weekly: Enter a time in the formathh:mm, specify AM or PM, then select a day of the week.
Monthly: Enter a time in the formathh:mm, specify AM or PM, then select a date.
Annually: Enter a month, day, hour, and minutes in the formatMM/DD hh:mm. Specify AM or PM.For Enter cron expression: Enter the desired schedule in the form of a cron expression. For example, a SQL job run weekly at 9:30 AM on Monday, Wednesday, and Friday:
30 9 * * 1,3,5
-
-
Optionally, expand the Advanced options section, where you can set the following properties:
- Default catalog: From the drop-down, select the catalog that corresponds to the data source that you want to query. This allows you to write queries without specifying the catalog in the query.
- Default schema: From the drop-down, select the schema in the catalog that corresponds to the data source that you want to query. This allows you to write queries without specifying the schema in the query.
- Session properties: Provide the key and value of a session property
that you want to apply to the entire SQL job.
-
Click Create SQL job.
View SQL job details #
To view the details of a SQL job, click the name of the job. The header of the Job details pane displays the following information about your SQL job:
- Description: The description provided for the SQL job.
- Next run: The next date and time the SQL job is scheduled to run. If the schedule is paused, the status of the schedule also appears here.
- Cluster: The chosen cluster.
- Executing role: The role running the SQL job.
Run now allows you to run the SQL job instantly.
Completed queries, queries in progress, and failed queries appear in the Job history section, which displays the following information:
- Query ID: A unique identifier for each statement. Click the query ID to view statement details. If the job contains multiple queries, you can expand the row to view the ID and details of each query.
- Status: check_circle for successfully completed queries and close for failed statements.
- Started: Date and time the query started running.
- Elapsed time: Total duration for processing the query.
-
Query progress: How much of the process is completed; shown as a percentage.

Manage SQL jobs #
You can manage SQL jobs in the SQL jobs pane and Job details pane. Click themore_vertoptions menu to edit, delete, pause, or resume the selected SQL job.
Is the information on this page helpful?
Yes
No